Showing posts with label Environment_Brief. Show all posts

Thursday, 19 November 2015

Environment Brief: 3 week hand in

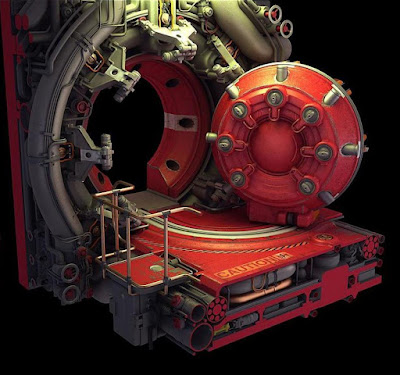
This is a 43k environment in Unreal. I used 5x1024 and 2x512. The Project was to create what is on the other side of the following door.


I used 3DS-Max and or Z-Brush to model the assets, including creating High polys for bake using X-Normal. I unwrapped the Meshes in 3DS-Max, except for the Megalith which was unwrapped in Z-Brush.

I used Photoshop and Substance painter to create the textures. Some of the textures have been created in engine due to variations in tiling. 

The environment was then built in the Unreal Engine.

Screen Shots


Conclusion 

This project has not gone well. Even at this late stage I am not happy with the scene. I believe the environment needs Decals, Particle effects, Matinees and much better lighting before its portfolio ready. I have never successfully done any of these tasks so I still need to learn how to do them. So although these task could get sorted relatively quickly, the learning stage for anything new is always steep. Because of this these aren’t a feature of the environment at this point. They will be added in the future.

The environment though is truly modular and can be infinitely and efficiently expanded and or altered easily. The assets with only a few exceptions (the tree Alphas) are to a high standard. I am also happy with my efficient use of texture space and assets. Bar the centre of the room, all the assets that make up all of the container only add up to a 17k. Without the Lab assets this is only around 10K. Also all these assets only used two 1024s.


I’m also happy with the quality of the tree sculpt, retopology unwrap and texture. And I am also happy with the rock texture, although it is a bit shiny, it still needs to be roughened up a little bit.

I also learnt about the bump off set node and also further increased my Substance Painter skills.

The main problem with this project is that I spent far too long constructing and modelling the Tank in a manner that eventually tuned out to be disadvantages. I then had to re do this entire period of work in a better fashion. This led to the whole tank being made from small modular pieces which now I now allot more about. Generally all parts of this project were over worked. The walk way was modelled, unwrapped, Textured and constructed in scene four times before I settled on a high enough quality, yet efficient design. This constant reworking of assets is true of many aspect in this project.  This may have resulted in generally high quality assets but many vital features to the environment are missing. Also due to time constraints at the end some assets that I know need further work (Rock Roughness and form, Door Roughness and normal, Tree Alphas, Grass Height etc) have not been altered.

Over all I have never done anything like this before so I am happy with what I achieved in the time. I am not happy though with the finale lighting, composition and lack of particle affects and matinees.   


Wednesday, 18 November 2015

Environment Brief: Week 3 Blog 2

I finished modelling, unwrapped and packed all the assets that I started to model on the first day of this brief. Thursday of week one.


 Here I’ve started to scatter branch planes around. I created these planes using the same technique I used for the grass planes. I made the entire branch in 3DS-Max and then projection mapped it onto the same plane as the grass. Like the grass I colour picked the colours and applied a gradient in 3DS-Max as the texture for the branch pieces. In this image you can also see that the Door mesh that I made was modular and can take the place of any of the wall squares. In this image you can see that I have also made the modular lighting rig. For future reference all of the assets that have to sit at a particular angle, and or height relative to other assets are modular and will snap in place. This also means that in unreal if you have an object highlighted in your contents browser and then right click on an object in the scene, you can the select the highlighted asset to replace the clicked on asset. This is an extremely quick and easy way of altering the environment without having to ever use the move tools.


Here I have added more branches to the tree. I had allot of trouble trying to get these to sit correctly. There is a very fine line between not enough leaves and making them far too dense. This is a very long process of trying many different densities within the texture, and or geometry. In the end I’m still not very happy with the foliage for this tree.

Here you can also see that the lighting broke for the grass directly in front of the starting point for the player. I tried to fix this by altering Light map sizes but this didn’t work.


Another annoying thing about foliage is that you really need to have the lighting built to see what it will look like, and this can take a very long time, and is extremely inefficient to do frequently.

Wall Texture 


Here I have multiplied the roughness with the AO in order to add greater variation to the texture. I have also multiplied in a second normal map.

Propulasion


I spent a long time playing with lighting, laying out props and generally working on the composition of the environment. I never really found a point when I was really happy with it.

This is the first project within which I have altered lighting and actually built the project, in all our group projects this has always been some body else’s job. I have always been an asset monkey. As a result I currently don’t really know how to push the level. I know that it’s missing allot, but is this something that can be saved with improved lighting. Is it composition? There are processes that I know I need to add to the level but simply don’t have time to learn how to do and then apply to the level. These are matinees and particle affect. I think if I were to do some basic matinees, some flashy particle effects and better lighting the project would be completely done. For now though I must continue doing things that I already know how to do.


Further propulasion


I tried a bunch of stripe variations on the whole room.  I tried multiple divisions and multiple widths, and shades, but eventually chose not to continue in this direction. 


 These are all my finished assets in one seen. I am well under the 80K budget, all these assets currently sit at 43K. 

Hand In

This brings the project up to Monday. On this day my plan was to hand all my work in and do all the documentation. Sadly though I spent the entirety of this day simply trying to get the engine file to run.  I didn't know that it's bad practice to copy and paste an engine scene. This can deteriorate files which can cause many issues in engine. 

My engine file on one computer would open but with no light in the scene, and with the entire Unreal interface inoperable. I then tried another computer where it would fail right at the end of an extremely long loading time. I then tried to open it directly off of my External hard drive. This version appeared to work at first and I was able to try and get screen shots for about an hour, then during a lighting build it blue screened the computer. I called it at this point and began work on my Shop Front Project. 

The following day I decided to work from home on the environment where the only working version existed. I thought as I would have to wait for a new Hard Drive to arrive so couldn't hand in yet that I may as well do a little bit more work.  During this day I changed the lighting and general lighting and composition again. I also tried to create some Decals for the scene, as this is something that the environment is desperately missing. Sadly though even with a peer who was current using Decals in their own scene, and Tutorials we could not get them to work in my scene.  We concluded this must be a result of the deterioration of my engine files. I then also tried to make a post processing volume but with the same result.

 On Wednesday I was finally able to load my work up onto the K drive for submission. I didn’t do anything special, it simply was functioning this time after being dropped just like before onto the K Drive. Maybe at this point other features have fixed there selves, hopefully they have. But I now have to move onto the next project. If I still can’t use Decals and post processing volumes the only solution is to re-build the hole seen. Only then will this work be to a truly finished standard.


Monday, 16 November 2015

Environment Brief: Week 3

I modelled the door and then made high polies and baked it down. I also baked the Floor Slice.


I textured the door in Substance painter.


I also baked the steps, and then textured these in substance painter. I’ve also used a little bit of Bump off set in engine to Parallax these slightly.

I also made the rocks at this point. I sculpted these in Z-Brush starting with a single sphere, using the move tool and Dyna mesh I deformed the sphere into the desired shape. I then used a combination of clay tubes and the Trim tools to create some more rocky forms. I then used the Surface Modifier to add some Noise to the surface. This sculpt was then saved as the high poly ready for baking. After I decimated this and then unwrapped it in Z-Brush I then exported the result as the low poly. These were then baked in X-Normal. I then created 3 tileable rock textures in Photoshop, these were then applied to the mesh in substance painter. I also colour picked some moss from pictures of megaliths to add variation and some colour.


 The above picture includes the finished rock. I have since realised that the large edges are too smooth, they need to be sharpened. There also needs to be more visible breaking planes, delamination’s and or cleavage planes.   But as they sit they will have to do for now.

The above image shows a developing grass material. This image demonstrated the fine tuning that has to take place when creating foliage of this type. The above grass looks alright but there is a single blade of grass that is visibly repeating. This particular slice of grass will have to removed and or altered and then the projection map of these assets will have to be repeated


This is the result of the following re bake.


 This is the finished grass texture, this is actually still a repeating blade here as well, but I had to move on.


So this is where I’m at with the centre of the room, I have finished the rocks, the tree and the hill including the grass alphas.


Friday, 6 November 2015

The Tank: Environment Brief

After getting some feedback from a peer I decided to do what I have been avoiding, that is to rebuild the entire oil tank out of modular pieces. The whole point of giving the space a complex surface pattern was so that complex shadows could be cast. The way that I initially put time into was to parallax a texture that would then be applied to all the surfaces. At the time I didn't realise that paralaxing didn't cast dynamic shadows as a result I am not happy with the tank as it currently sits. So I am now going to rebuild the entire tank.

After about 4 variants this is my final modular kit. The whole kit only adds up to 1.250 Tries.


 In engine these pieces (minus the centre cone) are rotated round and snapped vertically into place.  In height the pieces are a multiple of 10 in Max units, which means that they will also snap in Unreal. The rotation angle is 11.25%.


This is one of the variants, for this one I found the forms were much too large.


 This is the current set up for the tank. I think that this is a vast improvement from the paralaxed tank, particularly with the floor and ceiling which now have a concentric pattern.  Also I am very happy with the addition of the ceiling fan. These forms now as they are physical assets with geometry will cast shadows and catch light correctly.

Reminders

I am now going to move on from the tank, as I really should have finished this right at the start of the week. Here are some reminders for future alteration I may make to it.  

I may have thought of a way to make the randomly generated normal texture work with these new modular wall assets

I may also adjust the blades by raising half of them up. This may look more realistic.


The Tree: Environment Brief


Here I have modelled the tree using Z-Spheres. I then turned this into editable geometry using the Adaptive Skin tab. I then turned that into a Polymesh 3D and then retopologized it using the ZRemesher. I then Decimated that to around 9k.


This is the high poly for the tree which was then baked using X-Normal onto the unwrapped Decimated Low Poly tree.


I then textured the tree in Substance Painter, using my own Tillable bark textures.


Here is the tree in engine. I am yet to make the foliage for the tree. 


Friday Week 2: Environment Project

Feed Back

Finish blocking in forms

May be not have a flat wall texture, may be add geometry.

If the room is were not pure bright white, but darker then the light being emitted from the centre would appear much more dramatic.

Make the centre even more dramatic, even lager. 

Work

I spent the first half of this week white boxing out the room. After showing people the basic block out I realised that everyone naturally places the scene on the surface. This is due to the nature of the tree and the obelisk, these are assets that we associate with being out side. Because of this realisation I now began to research large existing hollow structures. I settled on the interior of an Oil/LNG tank.

This is a real construction, it’s an extremely interesting space and it should contrast nicely with the Fantasy centre seen.


Not all these tanks are as complex as the first image above. I did initially plan on making a tank closer to the second tank interior. This tank has much smoother walls, the same with the ceiling, also if you were to imagine that the tank was brand new and had absolutely no ware, newly painted etc, this could be extremely simply to create. This would put all the emphasis on the centre of the scene. 

After some feedback I decided to actually go for the first tank design. This was because here there was an opportunity to cast lots of complex shadows. If the light source is coming from the centre of the room and my room had all these complex geometric forms, the room it ‘self should become quite dynamic.

I also saw an opportunity here to learn how to create parallaxed textures in Unreal. I thought that that if I managed to create a good texture, then this could be applied to all the main interior surfaces. This would quickly finish the majority of the room with one single texture, and the texture budget is the main constraint for this project.


This is actually all that is required to create a very basic Parallaxed texture, a Bump Offset Node and a Heightmap. I would have liked to learn how to add more layers to the Heightmap as can be seen in the following Unreal Texture.


But I really wanted to move on from blocking out the room, and start creating the assets in the centre.

The piece of this process that took the longest was creating the heightmap. For some reason I couldn’t get it to bake correctly, also Heightmaps take ages to bake far longer than Noraml and AO. I then also tried to Projection map the pattern in Max. Eventually I managed to create a sufficient map.


This is the result of my Parallaxed Texture. Although the Bump Offset has worked and I was given an OK from a tutor I actually wasn’t happy with this texture. The texture just isn’t as vivid as actual geometry. I just don’t think that it looks real. The problem here is that paralaxed forms don't cast dynamic shadows, I didn't realise this until completing this process.


After talking to a tutor about how to bring this texture forward we added the following nodes to the texture. This sequence creates a random value that is then randomly allocated to a single tile of UV space. This then when Added to the Normal channel alters the normal information slightly for every single tile. This gives a much more realistic light bounce from single tiles, creating the impression that they all sit at slightly different angles, creating a realistic level of imperfection. Below is the result of this. It would have been nice to have called these assets done at this point (apart from Albedo, roughness and Metalness).

 This is the finished result.


This is the white box scene as it sits at this point. Here I have also tried to multiply in an additional normal grid pattern that can be seen in the Ref image I am basing this off. The additional normal map after some tampering was simply doing odd things with tile variation that I was already using so I stopped trying to add it. 


More Design


Here I’m researching additional props, the environment, the wall texture and trees. I settled on a Yew Tree as they all ways have a mystical, ancient and warn/stressed quality to them. I wanted the tree to have a dramatic bend in it and still appear ancient. Oak trees for example when they are young enough to be tall handsome trees they don’t look all that gnarly. But when an Oak is truly ancient they tend to collapse and become broad stumps, this wouldn’t fit the form that I want the tree to have. Yew trees even when young always look twisted and Gnarly, it’s always believable that a Yew tree is ancient. Although a truly ancient Yew does follow the same form as an Oak. Both these trees hollow out and lose any kind of  defined trunk.


Here I have further added to the design of the room. The most important change here is that I have raised the walk way.


Thursday, 29 October 2015

Week 1: Environment Brief

GP_Environment Partially Stylised Brief 02

I have to make the other side of this door. I can design anything, but I must include the over side of the door. The budget is 3 weeks, 80k tries and a rough texture guide of 2x2048. 


Here are my initial Ideas. I wanted to make a space where the focal point was a tree and or an ancient ruin (megalith), and also I wanted some sort of sci-fi vibe.

My initial idea was a small meteor crater, right next to a tree. The tree would have a dynamic shape as it’s been blown back by the blast and sits on the very edge of this crater, with its roots partially exposed. Half the tree could also be drastically burnt, the other half would still be flourishing.
The meteor it’s self would be some kind of Sci-Fi orb that would be spewing out wires that have climbed up the tree in a fashion reminiscent to vines.

I liked this idea but I have just over 2 weeks to do this project, so I decided to concentrate on creating a concealed environment.

I then thought about placing a scene in a cave, but again this would require making the cave itself, this alone could be extremely time consuming. The focal point is the source of power and or interest in the centre of the scene, this is where my time needs to be spent.

I then started placing the scene in a sterile lab. This should create a nice contrast between the sterile mostly white lab conditions and the vivid fantasy tree/megalith in the centre.


 Initial Mood Board

Refined Mood Board